Sunday, September 27, 2015

Victorian Lady Card


Dylusions crushed grape, tarnished brass distress spray and perfect pearls were applied to embossed cardstock. I stamped the Inkadinkado Victorian lady 60-00726 in gold and black on vellum and painted the back of the vellum with distress paint. The happy birthday is from the Sizzix birthday and frames set 658206.

I would like to join the following challenges:


Felt with the Heart Stamp


I pulled out my stash today and wanted to combine various techniques to create a background. The card base is black cardstock and vellum stamped in gold pigment ink using Fiskars Henna Petals stamp. I stamped the Woman in Repose (Delta 3942F) on alcohol inked cardstock and embossed it with Tim Holtz Texture Fades Regal Flourishes (656648). I masked off her face and used Perfect Pearls on the background. The stamp sentiment is Stampabilities Felt with the Heart (DR110).

I would like to join the following challenges:


Thursday, September 17, 2015

Victorian Lady Tag

 
Simon Says Stamp Monday Challenge: Love This Technique

This technique is new to me but I just love it! Stamping on Tim Holtz idea-ology frosted and shaping your stamped image to add dimension to your project. I made my tag following Tim Holtz’s September 2015 tag tutorial. Click here for Tim Holtz’s supply list and tutorial.


Hickory smoke and tarnished brass distress sprays were used to create the tag background. I stamped the Inkadinkado Victorian lady 60-00726 and Stampabilities small monarch butterfly 155432-c on alcohol inked alcohol ink cardstock and frosted and used the gothic THS026 layering stencil.

12 Tags of 2015... September tag

Tim Holtz’s September 2015 tag is gorgeous! I love following his tutorials and learning new techniques. Join in the fun here.


I’ve been waiting for my order to get started on this month’s tag and it arrived! It was so much fun trying different alcohol ink color combinations and seeing the results. I’m glad I ordered two packs of alcohol ink cardstock so I still have some left! Tim Holtz idea-ology frosted is really cool to mold and shape to create special effects. I have never worked with it before but I will be including it in future projects.
 

 The front of my tag background was made using hickory smoke and tarnished brass distress spray and on the back of the tag I added picket fence distress spray to the mix.  I used the gothic THS026 layering stencil, the butterfly from Tim Holtz’s flights of fancy clear stamp set css25856 and the Sizzix lady with hats die set 657854 on this tag.


I would also like to join the following challenge: Simon Says Stamp Wednesday Challenge - Die Crazy.

Sunday, September 13, 2015

Tea Time Thank You Card

I made this card for Simon Says Stamp and Punch/Die Cut Monday Challenge and  Simon Says Use A Stamp And Blog Hop Wednesday Challenge. The Designers Spotlight has so many beautiful cards and my card background was inspired by Lin’s  repeating bus.   


supplies:
  • surfaces: cardstock, vellum, glossy photo paper
  • dies: sizzix labels & bow 657757, spellbinders elegant ovals s4-425
  • stamp & die sets: sizzix tea time 659056
  • stamps: stampendous personal notes mini quad cube mtc03, inkadinkado Victorian Lady 60-00726, Fiskars latte love 01-005511
  • distress ink: worn lipstick, antique linen, walnut
  • ink: a la mode gold, stazon jet black
  • adhesives: scotch quick-dry adhesive, double sided tap
  • misc: stickles, removable tape, foam tape


I wanted a thank you card for a dinner party and found my Victorian lady stamp and tea time stamp set. I randomly stamped the spoon in gold on the background.  The lady was stamped on alcohol inked photo paper, vellum and card stock. I fussy cut her face, added distress ink and thought it still looked a little stark so I added vellum over her face and hair. The tea set was stamped on alcohol inked photo paper and accented with gold stickles (can’t resist bling).  

Tuesday, September 8, 2015

Simon Says Make it Colorful Shoe

What a fun week with Simon Says Stamp Make it Colorful Wednesday Challenge I like making paper shoes and this time I made then colorful and added a treat bag.
 

supplies:
  • surfaces: cardstock, glossy photo paper
  • dies: sizzix alphanumeric 660056, spellbinders elegant ovals s4-425, sizzix banners and pennants 660329
  • embellishments: organza favor bag, idea-ology paper sting, mini brads, bamboo skewer
  • distress ink: broken china
  • alcohol inks: caramel, stream, and more
  • distress paint: brushed pewter, broken china, wild honey, forest moss
  • distress spray stain: brushed pewter
  • metallic mixatives: pearl, silver
  • patina: verdigris, rust, moss, jade
  • distress stain: tumble glass, antique bronze, bundled sage
  • ink: colorbox yellow permanent ink, dylusions vibrant turquoise ink spray
  • tools: mini ink blending tool, scoreboard, bone folder, tonic shears, ruler, heat tool, magnetic platform, big shot machine, paint brush
  • adhesives: scotch quick-dry adhesive, double sided tap
  • misc: alcohol blending solution, styrofoam, removable tape, tooth picks

I used glossy photo paper and numerous inks on this shoe! I was experimenting with the alcohol inks and was looking different colors, grabbed ink bottles and started going to town. I started throwing them on the mat and swiping my paper across the beautiful colors. Hum, what's going on, these aren’t mixing the same but I continued on. Beautiful color but thick…then I looked at the bottles. It was patina (ha ha).  I guess you can use patina on glossy photo paper (and stains)!?!  I did get a different color for the shoe lining though! Guess I was really in the mood to make it colorful! This shoe is made with the glossy photo paper and the heel was made by layering and cutting Styrofoam.

 
The banners on the treat bag are strung on painted paper string paper.  I attached them to the favor bag by wrapping the string around a brad.

Sunday, September 6, 2015

Mom’s Birthday Card Box

I am having so much fun with this week’s Simon Says Stamp Trio of Colors Monday Challenge and Simon Says Stamp Make it Colorful Wednesday Challenge  working with color and groups of color. I made a box for my mom’s birthday card and just in time too!

 
supplies:
o             surfaces: cardstock, glossy photo paper
o             dies: sizzix flower, lily 658275, butterfly #12 656512
o             punches: fiskars small butterfly, three flower punches
o             distress ink: worn lipstick, pumice stone, dusty concord
o             alcohol inks: wild plum, butterscotch, eggplant
o             metallic mixatives: pearl, gold, silver
o             embellishments: cricut happy birthday, adhesive jewels, mini brad
o             stickles: blush, glitz and orchid
o             ink: colorbox pink, yellow, green permanent ink
o             tools: mini ink blending tool, scoreboard, bone folder, tonic shears, ruler, heat tool,                 magnetic platform, big shot machine, cricut
o             adhesives: scotch quick-dry adhesive, double sided tap
o             misc: alcohol blending solution, removable tape
 
This box has lots of bling so I hope my mom likes it. I enjoyed decorating the flowers experimenting with a variety of inks and stickles. The leaves are from the lily die set.

Mom’s Birthday Card

This week’s Simon Says Stamp Trio of Colors Monday Challenge and Simon Says Stamp Make it Colorful Wednesday Challenge immediately made me think of Tim Holtz’s beautiful September2015 tag. The vibrant colors he achieved using the alcohol inks made it a perfect match for these challenges. I don’t have alcohol ink cardstock but I couldn’t wait to try my alcohol inks so I used glossy photo paper. I hope you like the results.


supplies:
  • surfaces: cardstock, vellum, glossy photo paper, shimmer sheetz
  • dies: sizzix tea cup 656549, sizzix flower, lily 658275, alphanumeric 660056, celebrate 660211, spellbinders elegant ovals s4-425
  • stamp & die sets: sizzix tea time 659056
  • stamps: stampendous mod hatter v077, hampton art Fabulous Stamp ps0535
  • punches: fiskars small butterfly
  • embellishments: fussy cut stamped images, ribbon, bead, mini brads
  • distress ink: worn lipstick, pumice stone, dusty concord
  • alcohol inks: wild plum, butterscotch, eggplant
  • metallic mixatives: pearl, gold, silver
  • ink: colorbox permanent ink
  • tools: mini ink blending tool, hole punch, scoreboard, bone folder, tonic shears, ruler, heat tool, magnetic platform, big shot machine
  • adhesives: scotch quick-dry adhesive, double sided tap
  • misc: distress micro-glaze, alcohol blending solution, stickles, removable tape, foam tape

It was so much fun playing with the alcohol inks and seeing the different results.


The tea cup is popped up with pieces of stacked foam tape. I wrapped the ribbon around Tim Holtz’s rule (1 ½” wide) to make the bow. The flowers are made with the base of the lily die and the smallest leaf. 

On the inside of the card I stamp the lady (mod hatter) and bowl (sizzix tea time) on cardstock, vellum and alcohol inked photo paper. Fussy cut/die cut all the images and layered them. The bowl is vellum layered over the alcohol inked photo paper and the purple cardstock bowl edges layered on top. I really enjoyed experimenting with the different layering effects.

Sunday, August 30, 2015

Simon Says Stamp Monday Challenge: Ticket Please

My granddaughter’s birthday is in September and I wanted to make her a card. I found the Simon Says Stamp “Ticket Please” challenge and thought she is my ticket to happiness!


supplies:
o   surfaces: cardstock
o   dies: Tim Holtz sizzix celebrate 660211, Tim Holtz sizzix celebrate 660223, Tim Holtz sizzix Ticket Strip 656620, crafters companion diesire happy birthday cupcake wrapper
o   Tim Holtz layering stencil: THS003 rays
o   stamp: Tim Holtz THJ009 saying stuff, fiskars dates, stampology ticketed
o   embellishments: fussy cut pictures, punched flowers
o   Tim Holtz’s distress ink: mermaid lagoon, dusty concord, mustard seed, worn lipstick
o   ink spray: dylusions crushed grape, tsukineko sheer shimmer spritz
o   ink pads: reflections pool chalk ink pad
o   tools: waterbrush/flat, mini ink blending tool, palette knife (or plastic knife), scoreboard, bone folder, paint brush, tonic shears, ruler, heat tool, magnetic platform, big shot machine
o   adhesives: multi-medium/matte, scotch quick-dry adhesive, double sided tap
o   misc: texture paste, removable tape

  • Cut a piece of heavy cardstock (or use a tag) to the desired size. Arrange the thinlet dies making sure they do not overlap or hang off the edge of the paper/tag. Use removable tape (I used washi tape) to hold the dies in place and die cut the paper/tag.

  • Select or make a background paper (or second tag) that will show through your die cut paper/tag.


  • Using multi-medium, adhere the die cut paper/tag to the background paper/tag and let it dry.


  • Apply another thin layer of multi-medium over the whole tag and let it dry to seal everything.
  • Decorate your cover paper/tag using a blending tool and distress ink. I used mermaid lagoon, dusty concord, mustard seed and worn lipstick.

  • Place the stencil over your paper/tag and apply texture paste with a palette knife. Remove the stencil from your paper/tag and let it dry (Clean the stencil with water before the texture paste dries on the stencil).

  • Use distress ink to add color to the dried texture paste rays and stamp words on the texture rays with permanent ink.
  • Spritz the paper/tag with dylusions ink spray and sheer shimmer.


  • The tickets across the top were die cut from vellum, stamped and adhered with double-side tape. Add your embellishments.
 
  • I started the inside of the card by die cutting a cupcake wrapper. Fold it in half with the right sides together then fold the ends (right side out) back to the center fold so it is in a quarter. Punch three different size flowers and a circle. Spritz all pieces with sheer shimmer. Cut a slit in the middle of the smallest flower. Trim the ends of the cupcake holder so there is a tab that will fit into the slit in the flower. Put the tab through the slit in the flower and glue the tab to the back of flower. Adhere the remaining flowers to the back of the smallest flower and add the circle to the front.
 
  • My card is an 8 ½” x 11” cardstock folded in half. I placed double sided tape to the back of the flowers, folded the cupcake holder and placed it in the upper corner of the card. With the cupcake holder folded, close the card to adhere the other flower to the card.

Tuesday, August 25, 2015

12 Tags of 2015... August tag


Lots 
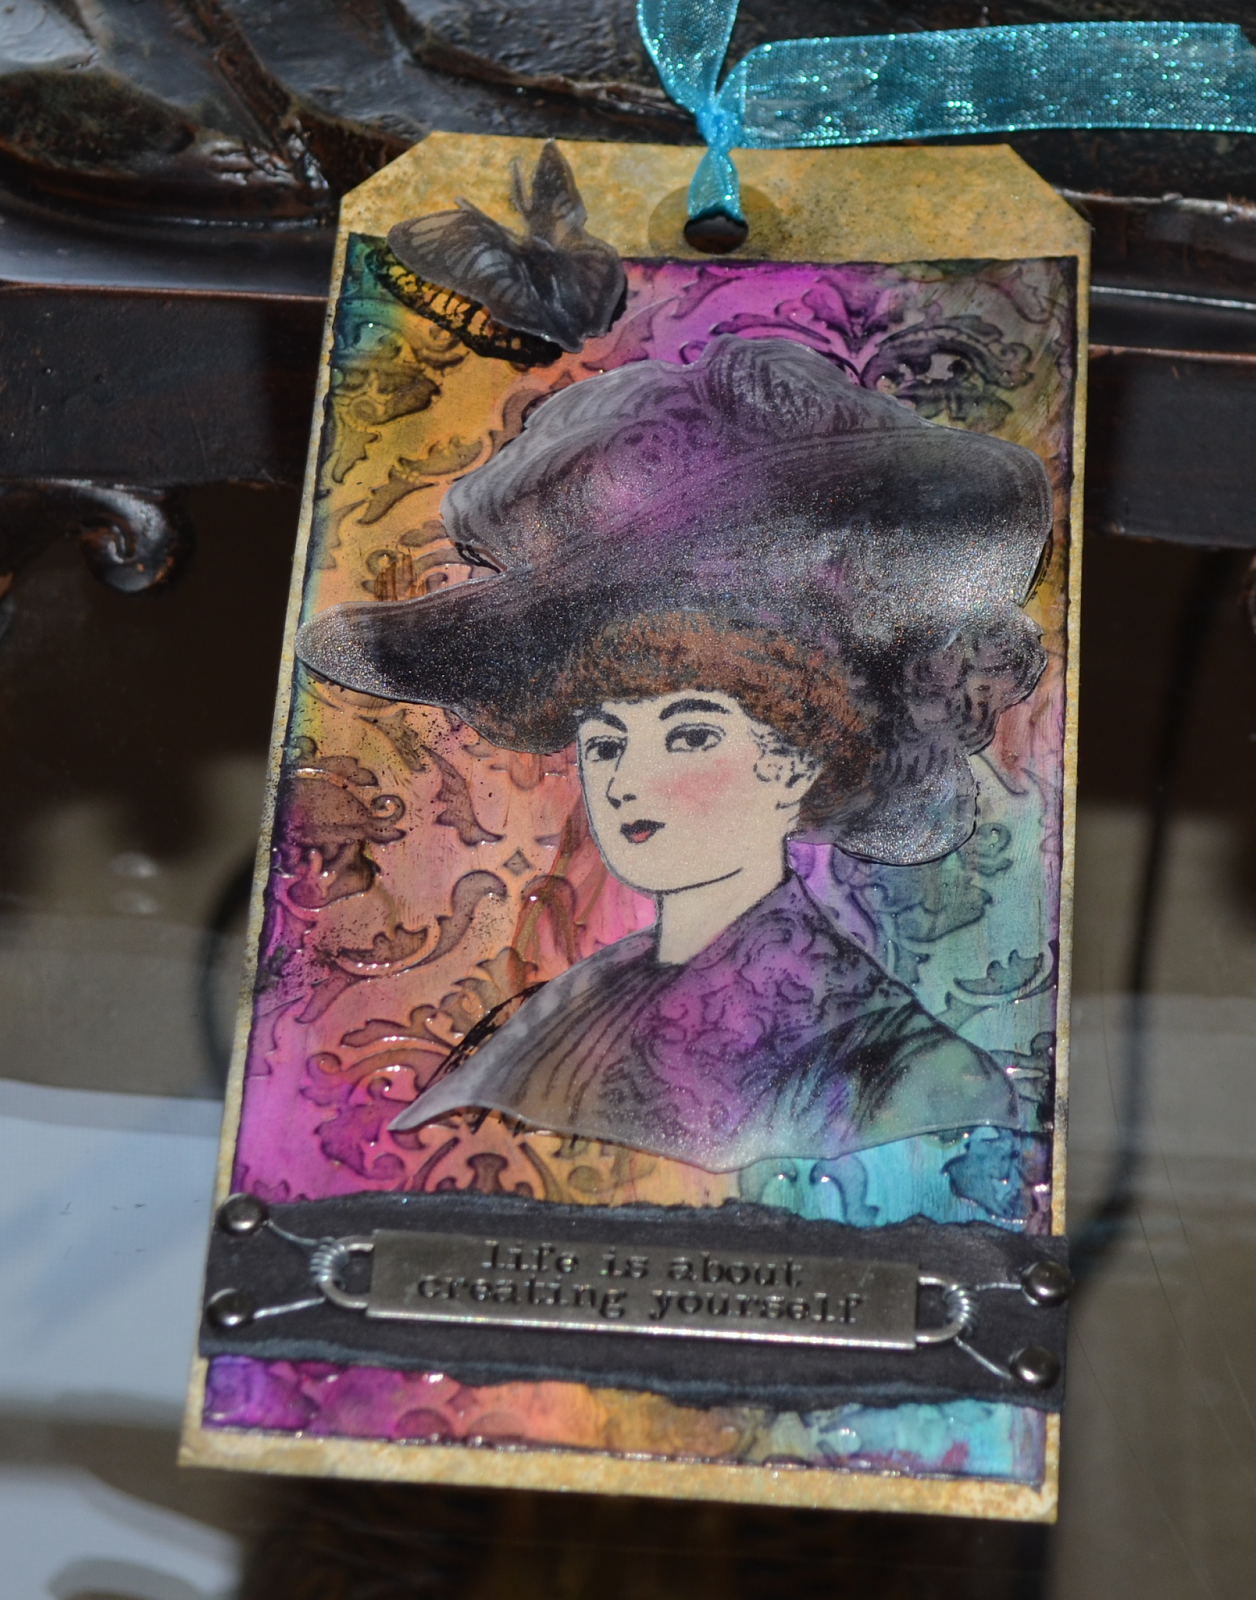
of fun techniques in Tim Holtz’s August 2015 tag! Check out how he used the thinlit word dies for a cool layering effect.  This tag is being used on a photo album page as a pocket.
 

supplies:
o   surfaces: #12 manila tag, cardstock
o   dies: journey movers & shapers 657203, Globe 660214, alphanumeric 660056, celebrate 660211
o   embellishments: game spinners, pen nib, compass charm, idea-ology paper string, fussy cut pictures
o   distress ink: mermaid lagoon, hickory smoke, evergreen bough, peeled paint, crushed olive, vintage photo, walnut stain
o   distress markers: broken china, black soot
o   distress paint: picket fence, tarnished brass, broken china
o   distress spray stain: brushed pewter
o   tools: waterbrush/flat, mini ink blending tool, hole punch, scoreboard, bone folder, paint brush, tonic shears, ruler, heat tool, magnetic platform, movers & shapers base tray, big shot machine
o   adhesives: multi-medium/matte, scotch quick-dry adhesive, double sided tap
o   mediums: gesso
o   misc: distress micro-glaze, removable tape

·        Die cut the journey movers & shapers die from your tag. Place the globe die on the edge of your tag and hold the die in place with removable tape (make sure it doesn’t overlap the die cut word journey). Place the magnetic platform and cutting pad as far left as it will go. Place the tag with the globe die as far to the right as you can and die cut the tag. This will leave about ¼” tag/die over hang that does not get cut (the globe will still be attached to the tag).


·        Arrange any additional thinlet dies you would like to use on the manila tag making sure they do not overlap or hang off the edge of the tag. Use removable tape (I used washi tape) to hold the dies in place and die cut the tag.

·        Adhere a piece of paper to a second tag leaving about ½” or more on one side and the bottom. This paper will show through your die cut tag and I wanted to have blue behind the globe so I created my background.

o      I placed the tag on the cardstock, carefully lifted the globe and made marks with broken china distress marker to get an idea where the globe would be. Then I traced around the globe die, filled it in using mermaid lagoon distress pad, picket fence paint, broken china paint, and spritzed it with brushed pewter distress spray stain. Use a heat tool to dry it or let it thoroughly air dry. Once it is dry, apply a small amount of distress micro-glaze to seal and protect the paint.

o      The remaining background was made using mermaid lagoon, hickory smoke, evergreen bough, peeled paint and crushed olive distress ink. I finished the background by spritzing it with brushed pewter distress spray stain.

 
·        After your paper is adhered to a second tag, draw a line 1/2 inch past the edge of the tag on the side you would like to attach to the project and on the bottom of the tag. Cut on the drawn lines and along the other 2 edges of the tag. Score along the edge of the tag and 1/8” from the tag edge. Fold and burnish to create hinges.

·       Cut the bottom/side hinge diagonally close to the corner so you can fold the hinges back. When you fold the side and bottom hinge they should not overlap.

 
·       Using multi-medium, adhere the die cut tag to the background tag and let it dry. I find it easier to line up the tags if I fold the hinges back.

·       Apply another thin layer of multi-medium over the whole tag and let it dry to seal everything.

·       Get a paper towel or rag. Apply a layer of white gesso over the entire tag and while the gesso is still wet, wipe away excess gesso to reveal the background through the letters/die cuts. Work fast as the gesso dries opaque. You can also add additional gesso on the die cut tag to add texture.

·       Using distress ink pads, swipe the ink directly over the tag using as many colors as you like. (I used mermaid lagoon, hickory smoke, peeled paint and walnut stain distress ink).

·        Apply a layer of multi-medium over the entire tag to blend the colors. Use a paper towel and lightly dab away excess ink. (After this, I swiped distress ink pads directly over the word journey so it would stand out more).

·       Adhere cut out photos, images and/or words to the tag in layers with glue or multi-medium. I backed some of my photos/images with the remaining background paper and/or inked the edges before adhering them. I connected the spinner with a brad to the images before adhering them to the tag.

o      Note: You may want to test printed images before applying multi-medium to the front of the images on your project. My ink-jet printed images smeared when applying multi-medium. I found that if I applied distress micro-glaze over the image first and let it dry there was minimal smearing.
 
·       Highlight some or all of your images by drawing a line around the images with a distress marker and smearing the marker with your finger.

·        Finish attaching your embellishments. I used Tim Holtz’s idea-ology paper string to attach my charm to the pen nib.

·        Finish the edges of your tag using a blending tool and distress ink or your finger and distress paint to create a shadow.

·       Cover all items you do not want to get paint on and splatter metallic paint over your tag. I splattered everything but the tag…I think I will stick with sprays J.

·       I wanted a nautical look so I used Tim Holtz idea-ology paper string (love it!). Take three different color strings and tied a knot in the middle. Braid both ends part way (you don’t have to braid them but you do need a knot or bead to cover the hole). Hold the knot on the front of the tag below the hole. Bring both braided ends over the top of the tag and thread them through the hole from the back to the front of the tag. Take one of the braided ends, wrap it around the knot and thread it back through the hole to secure the knot in place (you have one braid in the front and one braid in the back). Position the knot and braids where you want them (you can glue paper sting) and tie a knot at the top of the tag to secure the strings. You have six strings at the top of the tag.

·       I am using my tag as a pocket on an album page and did not want strings loose at the top. I braided the six strings together, glue the braid to the front of my tag and let the ends below the braid hang loose.
 
·       Apply double side tape to the side and bottom hinge. Attach the tag/pocket to your photo album page, scrapbook page or project.


Thursday, July 23, 2015

12 Tags of 2015... July tag


I love Tim Holtz’s July tag! The AMERICANA Cling Stamps are so versatile and a must have for vacation, military, and July 4th celebration scrapbook layouts and projects. This tag is being used on a photo album page as a double sided flip photo.


supplies:

•surfaces: #8 manila tag, distress watercolor cardstock, paper stash/lost & found, transparency film
•stamp: THMB006
•embellishments: crinkle ribbon, loop pin, traditions trinket, remnant rubs/special delivery
•distress ink: fired brick, faded jeans, hickory smoke
•distress markers: fired brick, festive berries, chipped sapphire, faded jeans, pumice stone, black soot
•inks: jet black archival ink
•tools: distress micro-glaze, distress marker spritzer, sanding grip, tonic shears, waterbrush/detailer, waterbrush/flat, heat tool, remnant rub tool, ruler, mini ink blending tool, hole punch, scoreboard, bone folder
•adhesive: scotch quick-dry adhesive, double sided tap  

 
·        For a double sided tag, draw around the tag on the back of patterned paper and cut out the tag shape. This will be used later.

·        Adhere a tag to the back of a different piece of patterned paper.

·        To add a hinge to the tag for attaching to a project:

Draw a line 1/2 inch past the edge of the tag on the side you would like to attach to the project.  Cut on the drawn line and along the other 3 edges of the tag. Score along the tag and 1/8” from the tag edge. Fold and burnish to create hinge.


·        Punch a hole through the top of the tag. Glue the previously cut paper to the back of the tag and punch the hole. Sand the edges (not the hinge edge) for a distressed look

·        Stamp the images on distress watercolor cardstock with permanent ink. I stamped an extra star to layer over the star image.

·        Using the edge of a ruler, tear the top and bottom edges of each stamped image.

·        Color the stamped images (you can use the waterbrush to blend colors) and dry with a heat tool.

·        Apply a small amount of distress micro-glaze over all colored images and rub off excess with a dry paper towel. This seals the color creating a resist.

·        Apply distress ink or stain to the craft sheet. Use the flat waterbrush to color directly over the entire stamped image and dry with the heat tool.

·        Ink the edges with frayed burlap using mini blending tool and adhere to the tag (If you added the hinge fold it back before adhering).

·        Cut excess paper from the tag being careful not to cut the hinge. Ink all the edges.


·        Use a sewing machine to sew around the tag edges (make sure hinge is straight out so you don’t sew it closed)

·        Using the distress marker spritzer, spritz black soot marker over the tag

·        Tape a piece of crinkle ribbon to your craft sheet. Using a distress marker color one edge blue and one edge red leaving the center white. Mist ribbon with water to blend color, dry with heat tool and crinkle ribbon.

·        Add ribbon, loop pin and embellishment through the hole in the tag.
 

Add finishing embellishments and apply a remnant rub using a remnant rub tool. The ship was printed on transparency film, trimmed and adhered with scotch quick-dry adhesive. The pictures were placed and the additional stamped star was placed over the picture aligned with originally stamped star. Finish the back side of the tag, apply double sided tape to the hinge and add it to your project.